What is Mechanical Testing?
Mechanical testing is used to determine properties such as hardness, modulus, fracture toughness or yield strength. Uniaxial compression and tensile testing are typically used to examine bulk samples to acquire elastic modulus data. Hardness test methods use an indenter probe that is displaced into a surface under a specific load. In traditional testing, the size or depth of indentation is measured to determine hardness. Microhardness testing is an industry standard for quality and process control for hardness data. Microhardness testing, with applied loads under 10 N, is typically used for smaller samples, thin specimens, plated surfaces or coatings.
Nanoindentation has advantages over traditional mechanical testing, providing both elastic modulus and hardness data. Integrated indentation testing (IIT) automates the indentation process so hundreds of tests can be performed on a small sample size. Some material composites and devices are too complex to apply traditional test methods. As dimensions shrink, mechanical properties change as the scale changes from bulk to micron to the nanometer. And a nanoindenter is often more accommodating with respect to sample geometry.
How a Nanoindenter Works
The factors involved in mechanical testing are load, displacement, area and time. Load (P) is the force exerted on the sample. Displacement (h) is the distance the indenter travels into a material. Area (A) is a measure of the interaction of the indenter in contact with the sample.
Nanoindentation is typically conducted with a calibrated Berkovic diamond indenter tip. A Berkovich tip is a three-sided pyramidal indenter. The three sides allow the tip to be theoretically sharpened to an atomic point.
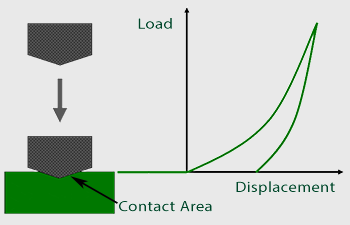
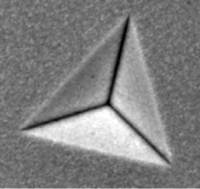
During the nanoindentation process, a calibrated indenter tip approaches the surface of the sample. The force-displacement data is used to determine the point of contact. After the sample is contacted, the force is linearly increased and the tip indents into the surface of the sample. A short dwell time occurs at the maximum force and then the sample is unloaded. At the initial point of unloading, the stiffness is measured.
The resulting load and displacement data along with the area from the calibrated indenter tip allow for the determination of mechanical properties such as elastic modulus and hardness.
Traditional Mechanical Testing
One of the most common mechanical test methods is the tensile test. The tensile test increases a tensile load in one direction, usually until a fracture occurs. The load can be applied in tension, compression or shear.
The resulting stress-strain curve is used to determine mechanical properties like elastic modulus, yield strength ,and fracture toughness.

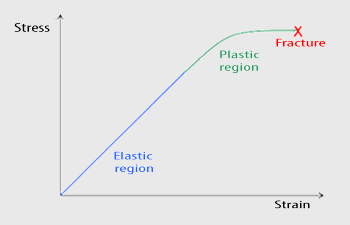
A traditional hardness test measures a material’s resistance to localized plastic deformation. Hardness tests are the most common mechanical test and typically are non-destructive for bulk materials. As dimensions shrink, the residual impression from a hardness test may alter the material properties. Standard microhardness testing is available for small or thin samples.
Microhardness Testing
Hardness test methods use an indenter probe that is displaced into a surface under a specific load. The indentation typically has a defined dwell time. In traditional mechanical testing, the size or depth of indentation is measured to determine hardness. Hardness testing is divided into two ranges: macrohardness and microhardness. Macrohardness covers testing with an applied load over 1 kg or about 10 Newton (N). Microhardness testing, with applied loads under 10 N, is typically used for smaller samples, thin specimens, plated surfaces or thin films. The two most common microhardness techniques are Vickers and Knoop hardness tests.
For more accurate and reproducible results, microhardness testing needs to account for effects of sample size, preparation and, environment. Samples must fit in the sample stage and be perpendicular to the indenter tip. An extremely rough surface may reduce the accuracy of indentation data; a proven method for polishing samples is recommended. The microhardness tester needs to be isolated from vibrations. For samples with multiple phases or variation in grain sizes, statistical data is required.
Traditional microhardness test methods optically analyze the indented impression, convoluting data with operator bias. Unlike Vickers or Knoop hardness test methods, instrumented indentation uses a three-sided pyramidal (Berkovich) indenter. This shape allows the tip to be theoretically designed to an atomic point. Using a high load nanoindenter for microhardness testing with forces ranging up to 1 Newton (N), instrumented indentation with an array of indents using dynamic measurements yields unparalleled accurate and reliable microhardness data with no operator bias.
Vickers Hardness
The Vickers hardness test uses a Vickers indenter pressed into a surface to a specified force. The force is usually held for 10 seconds. After the indentation is finished, the resulting indent is analyzed optically to measure the lengths of the diagonals to determine the size of the impression.
There is a degree of operator bias in this method, especially in the lower range of the applied load. According to ASTM E384-11, indentation diagonals should be greater than 17 microns in length. For coated samples, this test is not valid for coating thicknesses under 60 microns.
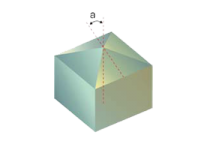

For many types of samples, the contact depth (hc) is not identical to the displacement depth (h) due to surrounding material getting elastically deflected during the indentation, as shown schematically (left). In addition to the above-mentioned sample and environmental considerations, this effect also affects accuracy and precision for microhardness data.
Knoop Hardness
The Knoop hardness test is also a microhardness technique that is similar to the Vickers hardness test method. A Knoop indenter is used to press into a surface to measure hardness. The Knoop indenter, however, is shaped differently than a Vickers indenter for microhardness or a Berkovich indenter used in nanoindentation. The shape for the Knoop indenter is more elongated or rectangular. The Knoop hardness test method is usually done with lighter loads for microhardness testing and careful sample preparation is required. Knoop hardness testing is applied to samples needing indentations close together or on the edge of a sample, both benefitting from the different probe shape.
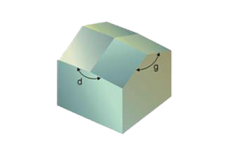
A designated load is applied for a specified dwell time. In contrast to the Vickers hardness method, the Knoop test method uses only the long axis. The resulting indentation measurements are then converted to a Knoop hardness number using a chart. For the Knoop indenter probe shown here, angles are d=172.50° and g=130.00°.
Due to the limitations with a lower applied load range, validity issues for thin films, and an increase in nanotechnology resulting in smaller dimensions, micro and nanoindentation methods have been developed.
