What methods are used for NAnoindentation?
Mechanical testing is used to determine properties such as hardness, modulus, fracture toughness or yield strength. Bulk samples typically are examined using uniaxial compression and tensile testing to acquire elastic modulus data which requires days of sample preparation and testing. Hardness test methods use an indenter probe that is displaced into a surface under a specific load. In traditional testing, the size or depth of indentation is measured to determine hardness leading to user bias in the data. Microhardness testing is an industry standard for quality and process control for hardness data. Microhardness testing, with applied loads under 10 N, is typically used for smaller samples, thin specimens, plated surfaces or coatings.
Nanoindentation has advantages over traditional mechanical testing, providing both elastic modulus and hardness data from a single test. Integrated indentation testing (IIT) automates the indentation process so hundreds of tests with micron spatial resolution can be performed on a small sample size. The nanoindentation tests can be performed as fast as each indent in less than a second making it the fastest mechanical characterization technique. The analyses of the data are automated removing any user bias. Some materials like composites and devices are too complex to apply traditional test methods where nanoindentation has a unique advantage. As dimensions shrink, mechanical properties change as the scale changes from bulk to micron to nanometer and nanoindentation can provide size-dependent properties while accommodating any sample geometry.
Thin Film Property Measurements
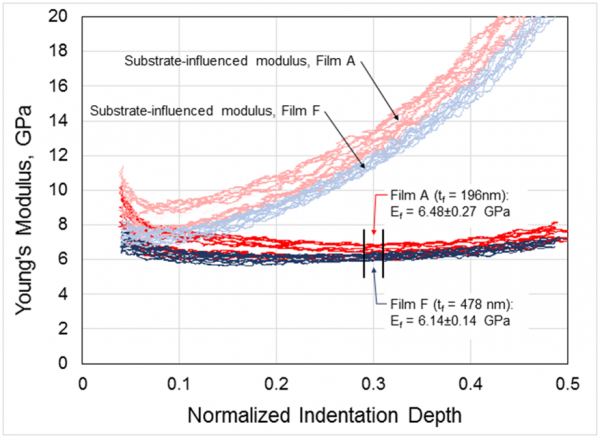
The nanoindentation experiments provide a significant advantage over any other mechanical testing method to measure the thin film properties. The superiority of the method lies in the high load and depth resolution in measurements and the post-processing of data.
The thin film properties get affected by the substrate on which they are coated. The nanoindentation data is analyzed by decoupling the substrate and film contribution analytically to calculate the true film properties. Thin films as low as 150 nm in thickness can be characterized by the thin film method of iNano and iMicro systems.
Scratch Testing
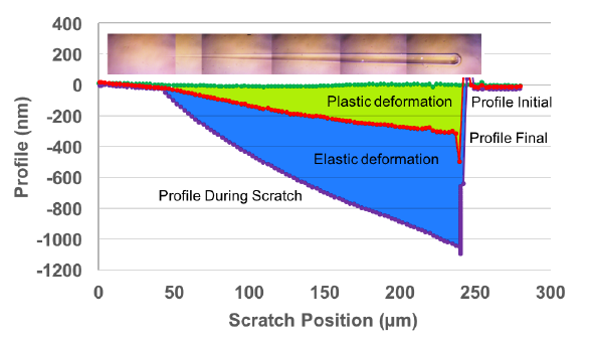
The scratch-testing option has the capability of characterizing scratch hardness, mar resistance, coating adhesion, film delamination, failure modes, etc. The quantitative scratch results are provided by measuring nanometers while moving millimeters. The scratch option is a valuable extension for iNano and iMicro users.
The scratch tests are particularly useful for coating failure analysis, determining the quality of film deposition and to measure the surface resistance. The experiment involved profiling the top surface before the experiments, following by scratch test to the desired load and distance. A final profile pass is then performed to measure the elastic recovery in the material.
Express Test
Express Test is an option that allows up to 100 indents to be performed at 100 different surface sites in 100 seconds. Express Test, is one of the fastest means of performing instrumented indentation for mechanical-properties mapping at the nanoscale.
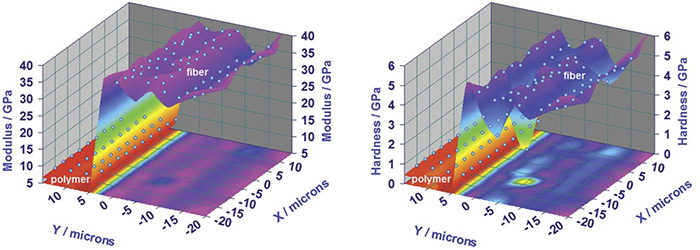
Express Test methods are ideal for applications that involve metals, glasses, ceramics, structural polymers, thin films, and low-k materials. This technique is particularly useful to investigate heterogeneity in the sample surface such as irradiated materials, heat treated materials, and multi-phase alloys when the properties are not constant across the surface.
ISO 14577/ASTM E 2546
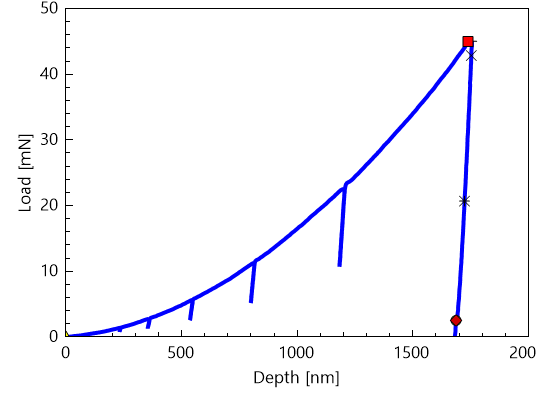
The ISO 14577 method is used to measure the modulus and hardness of different materials. The nanoindentation experiments can be performed by controlling load, loading rate, displacement, and displacement rate among many other parameters. The choice of these parameters depends on the material type and application need.
The ISO 14577 compliance has been set up by the National Institute of Standards and Technology as the standard method to qualify test methods, verification, and calibration of testing machines and calibration of reference blocks.
The process ensures that the instrument is performing up to the standards in surface contact determination, frame compliance, area function by indentation and calculations of the modulus (E) and hardness (H). The properties of the calibration samples are measured over 16 forces for the measurement accuracy of 0.1%.
Complex modulus measurements for polymeric materials
The polymeric materials show viscoelastic response and therefore the regular modulus and hardness measurements are not appropriate for characterization of these materials. The polymer properties are measured as the storage modulus representing the elastic part of the material and loss modulus representing the energy lost during loading. The experiments are performed with a flat punch. The flat punch is brought in contact with the sample and the properties are measured across the desired frequency range. The frequency sweeps provide the whole spectrum of information needed for the full understanding of polymeric materials.
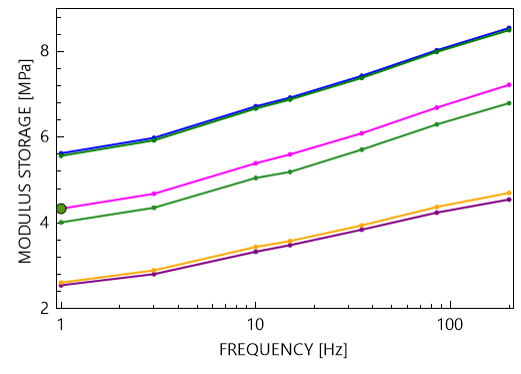
In mechanics, the viscoelasticity is measured in complex modulus, the term E’ called storage modulus is a measure of the energy that a material can store at a particular time. The E’’ called loss modulus is a measure of the amount of energy that is transferred/dissipated by the material during loading. The loss facto defined as a fraction of loss modulus to storage modulus. Only two of these three parameters are needed to fully describe the viscoelastic behavior of a material:
Storage Modulus: E’ = (σ0/ε0)cosδ
Loss Modulus: E” = (σ0/ε0) sinδ
Loss Factor: tanδ = E”/E’
Complex modulus parameters.
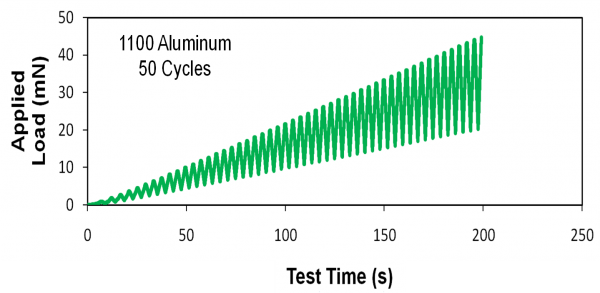
Cyclic Indentation
The fatigue characterization of any material requires repeated loading and unloading. The nanoindentation can be utilized to predict the fatigue behavior of material by applying cyclic loading. The nanoindenter loads and unloads the sample in repetitive steps as prescribed by the user.
The method involves loading the sample to the desired load followed by repetitive unloading and loading. The loading time, rate and unloading percentages can be set as per the user requirements.
